Battery switch on travel trailer function is crucial for managing your RV’s power. Understanding how to use it properly ensures safe and efficient operation of your trailer’s electrical systems, preventing costly damage and potential hazards. This guide breaks down the different types of switches, their operation, troubleshooting common issues, and best practices for maximizing battery life and minimizing energy consumption.
We’ll cover everything from connecting your batteries to integrating your switch with other electrical components.
Whether you’re a seasoned RVer or a first-timer, mastering your battery switch is key to enjoying worry-free adventures. This guide provides a step-by-step approach, using clear explanations and helpful visuals to make the process simple and straightforward. You’ll learn how to safely connect and disconnect your batteries, troubleshoot common problems, and understand the interplay between your battery switch and other power sources, like shore power and a generator.
Understanding Battery Switch Functionality in Travel Trailers: Battery Switch On Travel Trailer Function
Your travel trailer’s battery switch is a crucial component for managing your house batteries and ensuring safe and efficient power usage. Understanding its function and proper operation is key to preventing damage to your batteries and electrical system. This section will break down the essentials of battery switches in RVs.
Battery Switch Purposes
The primary purpose of a battery switch in a travel trailer is to control the flow of power to and from your house batteries. This allows you to disconnect the batteries completely to prevent drain when the trailer is stored, select only the house batteries for use with your trailer’s appliances, or combine the house batteries with your vehicle’s starting battery for charging or boosting.
This control prevents accidental drain on your batteries, extends their lifespan, and offers flexibility in how you manage your power.
Types of Battery Switches
Several types of battery switches exist for travel trailers, each offering varying degrees of control.
| Switch Type | Description | Features | Benefits |
|---|---|---|---|
| 1-2-Both | This is the most common type. It allows you to select either the house battery, the vehicle battery, or both. | Simple operation, three positions | Easy to use, good for basic needs. |
| Disconnect | This switch simply disconnects the house batteries completely from the trailer’s electrical system. | On/Off functionality | Prevents battery drain when the trailer is stored. |
| Combination Switch (with additional features) | Some switches combine a disconnect with other features, such as an inline fuse or a charging control. | Multiple functions in one unit | Convenience and improved safety. |
| Remote Battery Switch | These switches allow you to control the battery from a location outside the battery compartment. | Improved safety and convenience | Avoids accessing potentially dangerous battery compartments. |
Operating a Battery Switch
Before operating any battery switch, always refer to your specific switch’s instructions. General steps are:
1. Locate the switch
So, you’re an audiophile who travels? Awesome! Check out this guide on creating the perfect audiophile travel setup for pristine sound on the go. It covers everything from portable DACs to noise-cancelling headphones. Then, if you’re looking for inspiration for your next trip, maybe you’ll find some amazing listening spots mentioned in another great resource on audiophile travel setups that focuses on integrating your listening experience with unique locations.
Remember, great sound doesn’t have to stay at home!
This is usually found near the battery compartment, though remote switches are also available.
2. Identify the positions
Familiarize yourself with the switch positions. Common positions include “Off,” “Battery 1” (house battery), “Battery 2” (vehicle battery), and “Both.”
3. Select the desired position
Turn the switch to the appropriate position to connect or disconnect the batteries as needed. For example, to use only the house batteries, select “Battery 1.” To disconnect the batteries entirely, select “Off.”
4. Verify the connection
After changing the switch position, check the relevant circuits to ensure the power is on or off as intended. Use a voltmeter if necessary.
Understanding Switch Positions
It’s important to understand what each position on your switch does. Improper use can lead to battery drain or damage to your electrical system. Always consult your owner’s manual for specific instructions relating to your RV and battery system. Incorrect usage can result in damage to sensitive electrical components within the trailer. For instance, leaving the switch in the “Both” position while the trailer is stored could lead to a completely drained battery.
Connecting and Disconnecting Batteries
Connecting and disconnecting your travel trailer’s battery to the main power source is a crucial task for both safety and functionality. Doing it correctly ensures your appliances work and prevents damage to your battery and electrical system. Understanding the process and taking necessary precautions is essential for every RV owner.Connecting your travel trailer’s battery involves several steps, and it’s important to follow them in order to avoid accidents and ensure a secure connection.
Proper maintenance of the battery terminals is equally important to prevent corrosion and maintain a reliable power supply.
Battery Connection Process
First, locate your battery and the main power source (usually a battery disconnect switch). Ensure the switch is in the “off” position. Then, using the correct gauge wire and connectors (refer to your trailer’s manual for specifications), connect the positive (+) terminal of your battery to the positive terminal of the power source. Repeat this process for the negative (-) terminals.
So, you’re an audiophile who travels? Awesome! Check out this guide on building the perfect audiophile travel setup for those amazing hidden retreats. It’s all about packing light but smart. Then, once you’re back in civilization, maybe you’ll want to explore some museum exhibits; I found this resource on audiophile travel setups that focuses on maximizing your listening experience even in less-than-ideal environments.
Basically, it’s all about prioritizing sound quality wherever you go!
Secure all connections tightly to prevent loose wires and potential short circuits. Finally, turn the battery disconnect switch to the “on” position.
Maintaining Battery Connections
Regularly inspect your battery terminals for signs of corrosion, which appears as a white, powdery substance. Corrosion can hinder the flow of electricity and damage your battery. To prevent corrosion, apply a battery terminal protector (a grease specifically designed for this purpose) to the terminals after cleaning them. This creates a barrier against moisture and prevents corrosion from forming.
Another helpful practice is to periodically clean the terminals with a wire brush and baking soda solution to remove any existing corrosion.
Safety Precautions When Working with Batteries
Working with batteries involves some inherent risks, so it’s important to take the necessary safety precautions. Always wear safety glasses to protect your eyes from potential splashes of battery acid. Batteries emit flammable hydrogen gas, so ensure adequate ventilation while working near them. Never allow sparks or open flames near the battery as this can cause an explosion.
Wear gloves to protect your hands from battery acid and to improve your grip when handling the battery terminals. If you are unsure about any aspect of the process, consult a qualified technician.
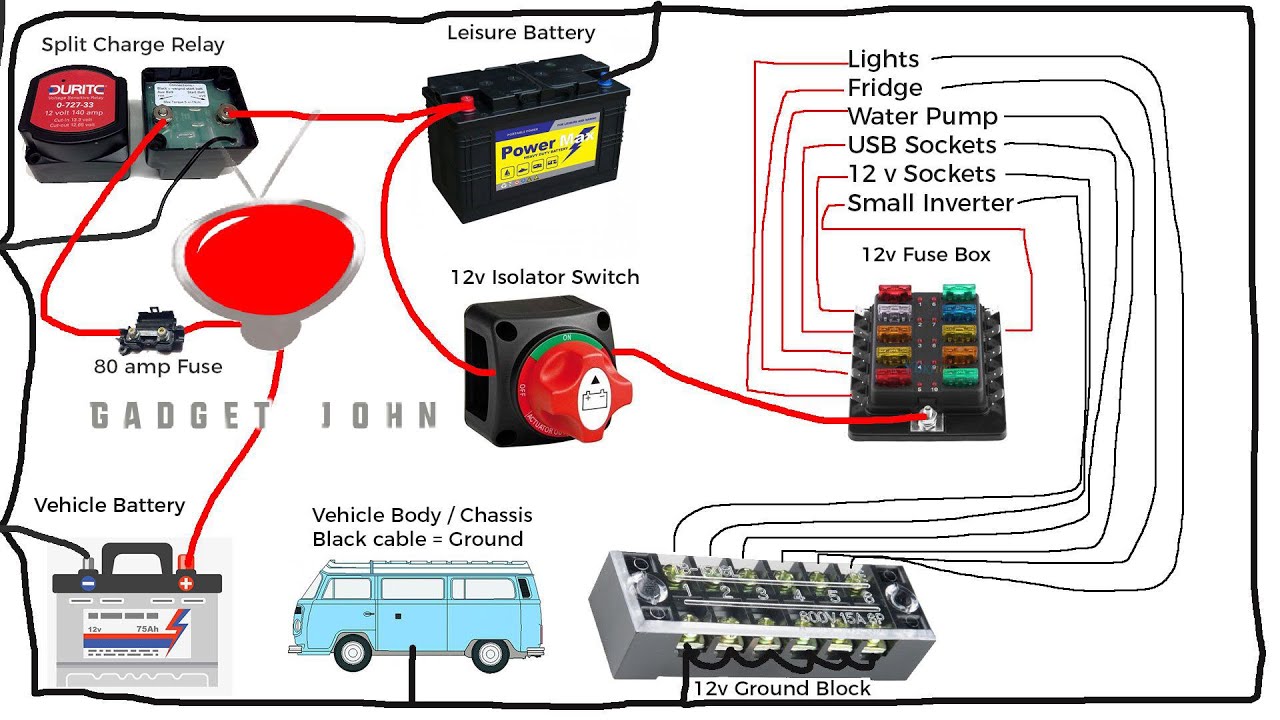
Battery and Battery Switch Diagram, Battery switch on travel trailer function
Imagine a rectangle representing your travel trailer’s battery. Label the top terminal “+ Positive” and the bottom terminal “- Negative”. Draw a line extending from the positive terminal to the right. At the end of this line, draw a circle representing the battery disconnect switch. Label the two terminals of the switch “+ Positive” and “- Negative”.
Draw another line extending to the right from the switch’s positive terminal, ending in a larger rectangle labeled “Trailer Electrical System”. Draw another line from the switch’s negative terminal to a similar larger rectangle labeled “Trailer Electrical System”. Finally, draw a line from the battery’s negative terminal directly to the larger rectangle labeled “Trailer Electrical System”. This illustrates the connection of the battery, the switch, and the trailer’s electrical system.
All connections should be clearly indicated with solid lines.
Battery Switch and Electrical System Integration

The battery switch acts as the central control point for your travel trailer’s DC power, dictating how power flows between your batteries and the various electrical components in your RV. Understanding its interaction with other systems is crucial for safe and efficient power management.The battery switch is the gatekeeper for your trailer’s 12-volt DC system. It controls whether power from your batteries feeds the trailer’s lights, water pump, refrigerator (if 12V), and other DC appliances.
The way it interacts with the converter and inverter affects how your AC and DC systems work together. When the switch is engaged, power flows from the batteries to these components. When it’s off, that pathway is severed, protecting your batteries and preventing accidental drain.
Power Distribution Management
The battery switch’s primary role is to manage the flow of power from your batteries to the rest of your trailer’s DC electrical system. With the switch ON, the batteries are connected to the system, supplying power to all connected DC appliances. Turning the switch OFF completely isolates the batteries from the trailer’s electrical system, preventing accidental discharge and protecting your batteries from draining completely.
This is vital for storage or when the trailer isn’t in use for extended periods. In some systems, an intermediary position allows for charging the batteries from the shore power without simultaneously powering the trailer’s DC system.
Electrical Flow Comparison: Switch Engaged vs. Disengaged
With the battery switch engaged, a direct pathway exists between the batteries and the DC loads (lights, pump, etc.). The converter, which transforms AC power from shore power or a generator into DC power, charges the batteries. Even if shore power is connected, the battery switch’s status determines whether the trailer’s DC system runs off the batteries or is completely isolated.When the battery switch is disengaged, the connection between the batteries and the DC loads is broken.
The converter might still charge the batteries (depending on the system’s design), but the trailer’s DC appliances remain powerless. This prevents the batteries from being drained by the appliances when they are not needed.
Travel Trailer Electrical System Schematic
Imagine a simple diagram. At the left, you have two battery symbols connected in parallel (representing your two 12V batteries). A line connects them to a rectangular box labeled “Battery Switch.” This box has three terminals: one connected to the batteries, one labeled “OFF,” and one labeled “ON” (or “Load”). The “ON” terminal is connected to a larger rectangular box representing the “DC Distribution Panel.” From this panel, multiple lines branch out to various appliances symbolized by simple icons (a lightbulb for lights, a pump for the water pump, etc.).
A separate line from the shore power connection (symbolized by a plug) connects to another rectangular box representing the “Converter/Charger.” This converter has a line connecting to the batteries (for charging) and a separate line connecting to the DC Distribution Panel. Finally, a line from the DC Distribution Panel can connect to an optional rectangular box labeled “Inverter,” which converts DC to AC and has an output line to AC appliances.
The battery switch is central, controlling the flow from the batteries to the DC Distribution Panel. The converter independently charges the batteries, but the switch controls whether the charged power is available to the DC system.
Mastering your travel trailer’s battery switch is a fundamental skill for any RVer. By understanding its function, properly operating it, and performing regular maintenance, you can ensure the longevity of your batteries and the smooth operation of your trailer’s electrical system. This guide has provided a comprehensive overview of battery switch operation, troubleshooting, and integration within your RV’s power setup.
Remember to always prioritize safety when working with batteries and electrical systems. Happy travels!
Quick FAQs
What happens if I leave my battery switch on all the time?
Leaving your battery switch on constantly can drain your batteries, especially if you’re not using shore power or a generator. It’s best practice to turn it off when not in use to conserve battery power.
How often should I check my battery connections?
Inspect your battery connections monthly for corrosion. Clean any corrosion immediately using a wire brush and baking soda solution.
My battery switch is making a clicking sound. What’s wrong?
A clicking sound often indicates a low battery or a problem with the switch itself. Check your battery voltage and consider having the switch inspected by a professional.
Can I use a different type of battery switch in my travel trailer?
Replacing your battery switch requires careful consideration of amperage and compatibility with your trailer’s electrical system. Consult a qualified electrician or RV technician before making any changes.
